BAnim Documentation
v1.14.0
Read the Docs...
Welcome! This page contains documentation for the BAnim (Blender Animation) asset format for the Unity game engine and the BAnim Exporter Addon for Blender.
Use the navigation panel on the left to quickly jump between sections.
If you've never heard of BAnim Tools, check out the trailer to see what it can do:
BAnim: Blender to Unity Animation Tools
If you prefer watching to reading, check out the features demo, which covers everything documented here:
BAnim: Blender to Unity Animation Tools - Features Demo
Download and Install
The addon can be downloaded from its Gumroad Page.
In Blender, select Edit->Preferences, click on the Addons tab, click Install and open the file: djh_banim_exporter.zip.
In Unity, select Assets->Import Package->Custom Package... and open the file: djh_banim_importer.unitypackage, or drag and drop the package into your Unity project.
Overview
Blender Exporter
User Preferences
Enable the addon by searching for 'BAnim' in the 'Addons' tab of the Blender Preferences dialog.

The addon has two additional settings:
BAnim Export Path: defines a folder on your computer where .banim files will be saved.
Use Generic Rig Name: when this option is unchecked the paths assigned to animation curves in Unity will begin with the rig's name in Blender. When this option is checked paths assigned to animation curves in Unity will begin with 'rig'
e.g. rigs_blender_name/root/hips/position.x
VS rig/root/hips/position.x
If enabled, it is possible to play animations on rigs other than the one they were exported with... provided the rig hierarchy is overall the same.
If you use this setting, you will also need to rename the armature object to 'rig' in your character prefabs after importing them into Unity
BAnim Export Panel
The BAnim Export Panel is located under the DJH tab of the 3D View's Sidebar (N Panel) in Blender.
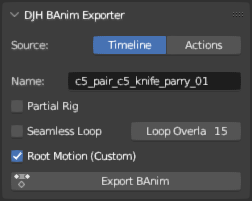
The Source setting lets you change what will be exported and has two options, Timeline and Actions
The Timeline option is recommended as the better feature, it will export the visible transforms on the selected armature object from the timeline's start frame to the timeline's end frame.
The Actions option is the legacy method and is far less flexible, to use it you must create a text block named 'banim_list' and define a list of objects and actions that you want to export. 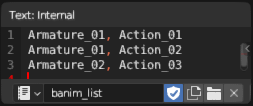
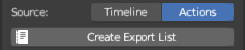
When exporting a list of Actions, the Create Export List button provides a quick way to create the 'banim_list' text block that is required for exporting.
When exporting the Timeline, the Name setting lets you choose the name of the file that will be exported, each object in the scene can have a different export name.
The Partial Rig setting lets you choose to export animation on only a subset of bones from the rig, the exported bones are defined by having a keyframe in an action named 'banim_export'.
See Partial Rig for more details.
When Partial Rig is checked, the Create Partial Rig Action button provides a quick way to create the 'banim_partial' action that is required for exporting a partial rig.

The Seamless Loop option can help create a perfect loop from an animation cycle with slightly different start and end poses (a pop).
See Seamless Loop for more details.
The Root Motion option lets you choose if custom root motion curves should be exported or not. This is only useful if you are using a custom root motion solution.
See Root Motion: Custom for more details.
The Export BAnim button, exports your animation in a single click and saves it in a .banim file. The file will be located in the folder defined in the user preferences, in a subdirectory with the same name as the armature object.
Unity Importer
The Import options will appear in the Unity Inspector after selecting a .banim asset.
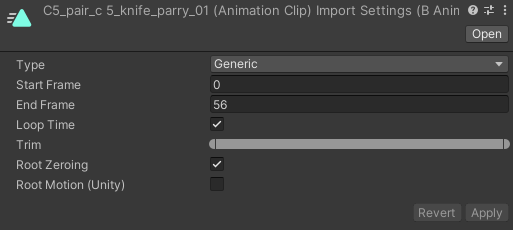
The Type setting allows you to categorize your animations for organization in an animation database or additional editor tools...out of the box it serves no purpose. The default import script defines two example types, Generic and Action.
See Animation Types for more details and examples.
The Start and End Frame values allow you to trim the animation clip.
The Loop Time checkbox allows the Unity Animator to play the clip in a loop.
The Trim slider is another way to edit the Start and End Frames.
The Root Zeroing option lets you choose whether animation curves should be imported for the 'root' bone or not.
See Root Zeroing for more details.
The Root Motion option lets you choose whether root motion curves should be imported for the Unity Animator or not. This should be off if you're using a custom root motion solution.
See Root Motion for more details.
Limitations and Gotchas
No Scale
The BAnim exporter does not export scale curves. If you have animated the scale of bones and need to export scale curves the scripts would need to be modified. On the plus side, if you only use location and rotation, there are fewer curves for the animator to process which will theoretically make the game run faster.
No Shape Keys
The BAnim exporter does not export shape key/blend shape curves. If you are using shape keys to animate the face or for another purpose the scripts would need to be modified.
Special Names
While I dislike the idea of having special names in principle, because they can cause a feature to not work if you don't use the 'magic words' sometimes using them is much simpler than the alternatives.
There are 4 special names to be aware of for the BAnim Exporter:
| Name | Scope | Description |
|---|
| root | Bone | The exporter expects a topmost bone in the hierarchy to be named 'root' |
| root_motion | Bone | When using custom root motion, the exporter expects a bone named 'root_motion' to be a child of 'root' |
| banim_partial | Action | When exporting a partial rig, the exporter looks at this action for a list of bones to include |
| banim_list | Text | (Legacy) When exporting actions, the exporter looks at this text block for a list of actions to export |
All of these special names are checked when exporting and will notify you if they do not exist.

Features and Examples
When exporting the Timeline, the BAnim Exporter will calculate and export the Visual Transform of each bone. This means you can constrain everything, bind bones to physics simulations, layer animations in the NLA, and export it all in one click without needing to first bake the action or introduce destructive workflows that make iteration difficult.
Root Zeroing
Usually in Unity you don't want your animated mesh to move away from the origin of its game object, rather we want the game objects to move through the world in sync with the animation. This could mean giving the character a walk velocity that matches the animation pace, or in other cases applying the motion of the root bone to the game object as an offset--see root motion.
With Root Zeroing on, the BAnim importer does not import animation curves for the root bone, this means you can animate your character moving through the scene, checking for foot slip etc... and still import an in-place animation into Unity.
Root Motion
While we don't want the animated mesh to move away from its origin, we often do want the game object to move. One way this can be achieved is with root motion.
Note: When using root motion it can be easy for the root motion to clip characters through walls or into the ground. Beyond simple cases and test environments, you will probably need some additional collision checks.
Unity's Built-In

Unity has a built-in root motion solution, there is a setting on the animator component that must be checked, and the animation clip must contain root motion curves.
To tell the BAnim Importer to import root motion curves, simply enable the Root Motion (Unity) option in the BAnim asset's import settings.
BAnim Custom
If you prefer to script your own solution for applying the root motion, the BAnim Exporter can generate curves on a 'root_motion' bone. To enable this check Root Motion (Custom) before exporting .banim from Blender.
You can imagine that the 'root_motion' bone is like a joystick that permanently pushes the rig in a direction. In other words, the 'root_motion' curves contain the frame by frame change or velocity of the 'root' bone. You don't need to animate the 'root_motion' bone, its curves will be calculated from the motion of the 'root' bone.
To use custom root motion, you will need to add a bone named 'root_motion' as a child of your 'root' bone.
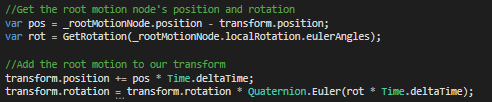
To apply the root motion in Unity you will need a script that reads the local position and rotation values of the 'root_motion' transform and adds them to the character's transform.
An example root motion script is included in the extras on the downloads page.
Partial Rig
Exporting a partial rig allows for easy animation layering, it's similar to using Avatar Masks but without needing the mask. This works by only creating keyframes for the bones that you choose to include.
Selecting which bones to include is done by giving them a keyframe in the 'banim_partial' action.
To prepare to export a partial rig, select the rig with the animation you want to export. In the BAnim Export panel, check the Partial Rig option.
A button will appear prompting you to create a partial rig action. Clicking it will create the 'banim_partial' action.

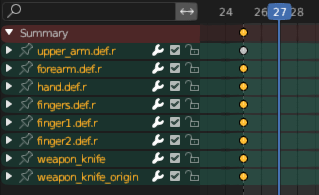
In Pose Mode, select the bones you want to include in the exported animation and insert any kind of keyframe.
This will add groups with the bone names to the action, these groups will be used to determine which bones to export.
Once you've added keyframes to all the bones you want to export, you can close the 'banim_partial' action and return to the animation you want to export.
Export the BAnim and check that it animates as expected in Unity.

Seamless Loop
Seamless Loop can correct minor differences in start and end poses to make a prefect loop, provided there is an extra cycle of the loop that can be trimmed off. The resulting animation will be one cycle shorter than the Blender timeline.
The Loop Overlap value should equal the number of frames in a cycle, or the number of frames you must rewind from the end frame until the pose matches the first frame.
When exporting, the exporter will take the number of frames defined by Loop Overlap from the beginning of the clip and blend into them at the end of the clip, so that the new last frame leads perfectly into the new first frame.

The seamless loop feature is especially useful if you are working with motion capture data or simulating some of your secondary motion with physics.
| Seamless Off | Seamless On |
|---|
 |
Markers and Events
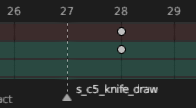
BAnim Exporter will export markers from your Blender Timeline and import them as Animation Events in Unity.
Markers in Blender that begin with an underscore are ignored by the exporter. The addon adds an operator (djh.banim_toggle_markers) that can be found in the search menu to add or remove the leading underscore from all selected markers.

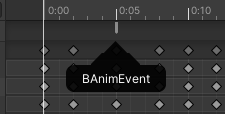
Animation events in Unity use the Unity Messaging System to invoke methods in the components on the game object that is running the Animator.
By default, the BAnim Importer adds an event to invoke a BAnimEvent(string name) method, where 'name' is the name of the marker in Blender.
In my game I use events to trigger sounds and visual effects, you can also use them to apply hits on specific frames, or anything else you can think of.
Any script that declares a BAnimEvent method can receive messages from the event and do something with them:
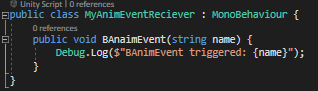
By customizing the import script, other kinds of events can be added.
See Script Customization
Custom Properties
BAnim Exporter can export animated custom properties from the Armature Data in Blender.
Note: the custom properties must be on the DATA not the OBJECT...
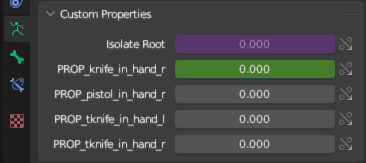
For the BAnim Exporter to recognize a custom property as one it should export, the custom property's name must begin with 'PROP_'. The 'PROP_' prefix will be remove during the export process.
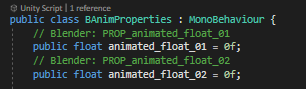
By default the BAnim Importer will import the curves and use them to animate values in the BAnimProperties script that comes with the importer.
To make use of the animated values, you will have to add the BAnimProperties component to the Animator's game object and you will also need to add the properties you defined in Blender to the BAnimProperties script.
Each property should be declared as a public float with the same name as their equivalent custom property in Blender...minus the 'PROP_' prefix.
Once you have added the properties and they are animating, you will want to do something with them. Using the LateUpdate() method, it is possible to change the transforms of bones in the rig because the Animator has finished its update. This is currently my main use for properties, to pass items in the character's kit between hands or attach and detach them from belts.
It would also be possible to use properties to drive blend shapes, or even for game play purposes, to mark when feet are on the ground, or maybe which frames of an animation provide a window of attack. It's up to your imagination really.
By customizing the import script the property curves can animate values in a different script.
See Script Customization
Script Customization
Much more is possible when importing assets into Unity but the details of how to implement it will depend on your own project and rigs.
The import script (BAnim/Editor/BAnimImporter.cs) contains a number of comments with examples of how additional functionality, customized for your game, could be added. Let's take a quick look inside.
Animation Types
At the very top of the script is the ActionType enum, this isn't really used by the importer, but can be very useful if you expand on it.

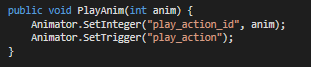
For example, in my project the BAnim Importer creates an entry for the animation in a database, and assigns them a unique integer ID. Another Editor script can get all the 'action' type animations from the database and rebuild the 'Actions' layer in the animator, automatically creating Any State transitions with the condition 'play_action_id == ID'
Playing an Action animation is now trivial:
Auto Assigning
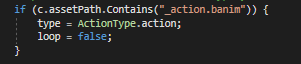
Another idea is to automatically pick settings based on the clip name. For example if the name ends in '_loop', import it as a loop, or as an action if it ends with '_action'
Read Properties
At approximately line 190 of the BAnim Importer script is the method ReadProperties, at the end of that method is the line of code that assigns the property curve to the BAnimProperties script.

The BAnimProperties type can be replaced by another, or the type can be dynamically selected based on the rig name or some other criterion.
Read Events
At approximately line 219 of the BAnim Importer script is the method ReadEvents, this method is responsible for creating the animation events in the clip.
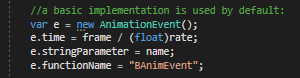
With a few modifications, it is possible to selected between several different funcitonNames, using the marker name or using some other criterion.
© 2023-2026 Daniel Hickox